Who can use this feature?
Add new client
1. Invite Client: From My Clients / People, select Invite > Client.

2. Confirm Person is Not Already Registered: Search using either the First and Last Name or just the Last Name.

- If no matches are found, select Continue and proceed to step 3.

- If a match is found, review the details to confirm it is the correct client. If it matches, you can view their profile and refer them to the appropriate service provider and caseworker.


3. Connect with an EOIS Service: To streamline the intake process, you can link the client’s account to an existing EOIS service. Choose one of the following options:
- Common Assessment (CA): Select this option if a Common Assessment has been submitted but the client does not yet have a profile in CaMS. This will import key details from Part 1 of the CA.
- Case Management: If the client has an active CaMS profile, choose this option to link their profile, providing a comprehensive view of their case within the portal.
- Continue without Linking: If the client does not have a CA or CaMS profile, select this option to proceed with manual intake.

If “Common Assessment” is selected:
4. Enter CA Number: Input the CA number and select Search.

- If the result shows the correct client, select Add Client to Portal.
If the result does not show the correct client, double check the CA number is correct.

If “Case Management” is selected:
4. Enter Client Reference Number: Input the CaMS Client Reference number and select Search.

- If the result shows the correct client, select Add Client to Portal.

- Confirm you wish to continue with this action by selecting Proceed.

If “Continue without Linking” is selected:
5. Finalize Portal Profile: After importing CA data, linking to CaMS, or proceeding without a link, complete the client’s portal profile by adding or updating the following details:
The following details can then be captured for their Jobs Portal profile:
- Service Provider Assignment*
- Caseworker Assignment**
Personal Details
- First & Last Name (required, auto-filled if imported from CA or linked to CaMS)
- Preferred Name
- Preferred Pronouns
- Email Address (required, auto-filled if imported from CA)
- Phone Number (auto-filled if imported from CA or linked to CaMS)
- Primary Address (auto-filled if imported from CA or linked to CaMS)
- Self Identification (auto-filled if imported from CA or linked to CaMS)
Work Details
- Target Occupations
Referral Details
- Referral Source
- Reference Number
- Referral Notes
- Service Needs
- Access to Transportation
Communication Preferences
- Caseworker Communications
- Job Post Updates
- Frequency
*Only visible to users with the Service Provider Group, Clients permission.
*Only visible to users with the Service Provider Administration, Clients permission.
6. Complete Portal Setup: Select Complete Client Setup once you’ve added the desired information.

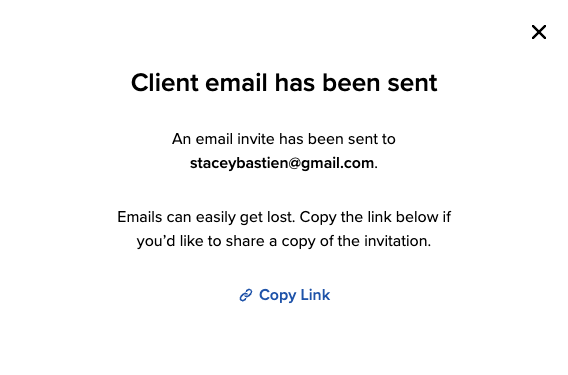
7. Confirmation: A dialogue window will appear to confirm the client has been added and an email invite was sent to the address provided.
Choose Copy Link if you’d like to copy the email invite to send to your client manually.
Select Proceed to Client Profile to exit the dialogue.


Resend portal invite
If the client did not receive the email invitation and has not yet set their password, the invitation can be resent
1. Navigate to the client’s profile in the Jobs Portal and select Actions > Resend Portal Invite.

2. A dialogue window will appear to confirm the email invite was sent to the address provided.
Choose Copy Link if you’d like to copy the email invite to send to your client manually.
Edit client
1. Access the Client Profile: Go to the client’s profile within the Jobs Portal. In the Overview tab, click the Edit button next to the section you wish to modify.

2. Save Changes: Once you’ve made the necessary updates, click Save.
- To maintain consistency across platforms, any client data present in CaMS must be updated directly within CaMS.
- Clients will receive an email notification if their email address is changed and will be prompted to confirm the new address.
